Software and Integrations
Some Luxafor devices work with the Luxafor Software. The devices that need this connection are Luxafor Flag, Luxafor Bluetooth, and Luxafor ORB. On the other hand, there are stand-alone devices that don't require any software, such as Luxafor Switch and Luxafor Cube. Then, there are devices like Luxafor Mute Button and Luxafor Pomodoro that need specific software for customization purposes.
Most integrations are available for both Windows and Mac OS versions of Luxafor software, but some are only available on Windows OS.
- Windows OS:
- Solid Color
- Timer
- Tomato Timer
- Zapier
- Webhook
- Microsoft Teams
- Jabber (Windows only)
- Solid Color
- Timer
- Tomato Timer
- Zapier
- Webhook
- Microsoft Teams
- With Luxafor Open Source Solutions, you can personalize and explore more functions of our devices, contributed by other Luxafor device enthusiasts on GitHub. Unlock endless possibilities! Please note that we do not take responsibility for the functioning of these contributions.
- In the Luxafor software's General section, you can select the mode (integration) you want to use. Remember, only one mode can be active at a time.
- If you're using the Zapier platform, you can have multiple integrations simultaneously. Zapier allows your Luxafor Flag to work with various apps they support. Learn more about Luxafor and Zapier integration here.
- For other software not directly supported or on the Zapier platform, you can still integrate it with Luxafor using the Webhook API, if available.
The current version of the Luxafor Software is compatible with the following OS:
Windows OS: 7, 8, 8.1, 10, 11
Mac OS: Mountain Lion, Mavericks, Yosemite, El Capitan, Sierra, Mojave, Catalina, Big Sur, Monterey.
The current versions of the Luxafor Pomodoro Software (for the physical Pomodoro Timer customization only) are compatible with the following OS:
Windows OS: 7, 8, 8.1, 10
Mac OS: Mavericks, Yosemite, El Capitan, Sierra, Mojave, Catalina, Big Sur, Monterey
NB! None of the Luxafor software versions are compatible with the Linux OS, however, there are a few open-source projects created by Luxafor enthusiasts that allow our devices to be controlled from Linux OS.
Compatibility
It is possible to connect the Luxafor Bluetooth device with a Luxafor App created for Android and iPhone devices.
Connecting Luxafor Dot to an Android Device
- Check if your Android version is no older than Android 5 (Lollipop).
- Download the app to your device from https://play.google.com/store/apps/details?id=com.greynut.luxafor.bt_luxofor&hl=en
- Turn on Bluetooth on your mobile device.
- Open the app and press “Connect”.
- Choose the closest “Luxafor Dot” from the list.
- Wait for the devices to connect.
Connecting Luxafor Dot to an iPhone Device
- Download the app to your device from https://apps.apple.com/lv/app/luxafor-2-0/id1559879690
- Turn on Bluetooth on your mobile device.
- Open the app and press “Connect”.
- Choose the closest “Luxafor Dot” from the list.
- Wait for the devices to connect.
Troubleshooting
- Make sure your phone's Bluetooth connection is enabled
- Check if you have the latest Luxafor Android app version 0.3.23, or version 2.0.1 for iPhone.
- If the Dot does not connect to the Luxafor app, try to reinstall the app.
- If the Luxafor app does not find the Dot, make sure the Dot is placed firmly in the Luxafor Power Bank and the Power Bank is properly charged. You may follow the Luxafor Bluetooth and Luxafor Power Bank troubleshooting guidelines to check if there is a possible hardware issue.
How to report issues
If the troubleshooting steps did not help and the issue still persists or your issue is very specific, please follow the guidelines below to report the issue in a way that will allow us to resolve it ASAP.
In the contact form (accessible by pressing "Contact Us" below or "Contact" and the top right corner of the window):
- Please provide your name and company (if applicable);
- In the "Message" space please describe the issue with as many details as possible. The description should include (but not limited to) answers to the following questions:
- Was the purchase made on our online shop or on Amazon?
- Is this a physical or a software issue?
- Which troubleshooting steps you have made already?
- If this is a software issue - which OS you are using?
- Your order number (if applicable) and date;
- Please provide any physical evidence (print screens, pictures, videos) where the issue can be seen clearly. If the report is about a connection, a video should be taken on how the device reacts exactly at the moment of the connection. If the issue involves both Luxafor software and Luxafor hardware - both parts should be clearly seen in the video in a way that best describes the issue.
Please note, that upon necessity we might ask additional questions to clarify the details of the situation. Your cooperation and patience during the investigation process are much appreciated!
Webhook API Basics
Compatible with Luxafor 2.0 software (Luxafor Flag, Luxafor Colorblind Flag, Luxafor Orb, Luxafor Bluetooth Pro, Luxafor Bluetooth)
Webhook API allows controlling your Luxafor device by sending HTTP POST requests to API endpoints, allowing you to integrate Luxafor with your applications and services.
- All API method endpoints are HTTPS URLs.
- The parameters to methods are passed as JSON in the HTTP POST body.
- HTTP request header “Content-Type: application/JSON” is required.
- The response body is JSON. It is possible to receive server error as an HTTP status code other than 200 in response.
- “userId” is your Luxafor ID and can be found on the “Webhook” tab in Luxafor software.
- To turn the Luxafor device off, use “Solid custom color” and send the following code: 000000
Available Methods
Solid base color
API endpoint: https://api.luxafor.com/webhook/v1/actions/solid_color
Request parameters:
{
  "userId": "<your Luxafor ID>",
  "actionFields":{
    "color": "<color from list below>"
  }
}
Accepted colors: “red”, “green”, “yellow”, “blue”, “white”, “cyan”, “magenta”
Solid custom color
API endpoint: https://api.luxafor.com/webhook/v1/actions/solid_color
Request parameters:
{
  "userId": "<your Luxafor ID>",
  "actionFields":{
    "color": "custom",
    "custom_color": "<6 symbol hex color code>"
  }
}
Blink
API endpoint: https://api.luxafor.com/webhook/v1/actions/blink
Request parameters:
{
  "userId": "<your Luxafor ID>",
  "actionFields":{
    "color": "<color from list below>"
  }
}
Accepted colors: “red”, “green”, “yellow”, “blue”, “white”, “cyan”, “magenta”.
Pattern
API endpoint: https://api.luxafor.com/webhook/v1/actions/pattern
Request parameters:
{
  "userId": "<your Luxafor ID>",
  "actionFields":{
    "pattern": "pattern from list below"
  }
}
Accepted patterns: “police”, “traffic lights”, “random 1”, “random 2”, “random 3”, “random 4”, “random 5”. Additional patterns accepted on Windows only: “rainbow”, “sea”, “white wave”, “synthetic”.
Basic Troubleshooting
- Make sure, that the correct form of the quotation marks is being used in the body (" instead of ”)
- Check that your Luxafor ID, as well as color name and code, are put in quotation marks.
- Although it does not apply to all environments it is possible that your input body is case-sensitive, therefore, we would suggest for you to use lowercase letters when entering the 6-symbol hexadecimal color code.

Connect Luxafor to hundreds of other apps with Zapier
Zapier lets you connect Luxafor to 2,000+ other web services. Automated connections called Zaps, set up in minutes with no coding, can automate your day-to-day tasks and build workflows between apps that otherwise wouldn’t be possible.
Each Zap has one app as the Trigger, where your information comes from and which causes one or more Actions in other apps, where your data gets sent automatically.
Follow these steps to create your first Luxafor Zap
1) Log into your Zapier account using this link or create a new account
2) Click on any “Make a Zap” button

3) Configure Trigger step:
- Choose a Trigger App from a wide array of options. For the purposes of this instruction, we chose Gmail as the Trigger App. Click on the "Continue" button when you're done.

- Select a trigger. For the purposes of this instruction, we chose New Email as the trigger. Click on the "Continue" button when you're done.

- Select a Gmail account, test it if you wish and click on the "Continue" button when you're done.
- Set up your Gmail Label/Mailbox (leave blank if you wish to receive notifications each time any new email is received.). Click on the "Continue " button when you're done.

- Test your new Trigger

- That's your Trigger step done. Now it's time to configure the Action step.
4) Configure Action step:
- Click on "Do this..." and choose an Action app from a wide array of options. For the purposes of this instruction, we choose Luxafor as an Action App. Click on the "Continue" button when done.

- Select an Action. You can choose from 3 types of actions: Play Pattern, Solid Color or Blink Color, and choose from a variety of colors or modes for each action. For the purposes of this instruction, we choose Play Pattern as the Action.

- Allow Zapier to access Luxafor
1. Find and copy the Luxafor ID in the Zapier Tab on Luxafor Software.

2. Paste your Luxafor ID into the Zapier authorization field, if you have not connected your Luxafor device yet. Click on the “Yes continue” button when you’re done.

3. If you have connected the device already, just pick that device and click on the “Continue” button.

- Set up the Pattern of your choice and click on the "Continue" button when you're done.

- Test your Luxafor device by simply clicking on the "Test" button. If you want to skip this step, click on the "Skip Test" button.

- Click on the "Done Editing" button.

5) Give your Zap a name and turn it on

6) Enjoy – you have just created your first Zap automation with Luxafor!

Shortcut for your everyday life with a Luxafor Button and Zapier
- On the Settings section of the Luxafor Button software tick ✓ enable Zapier

- Press the "Generate New ID" button and copy your Luxafor ID

- Paste your Luxafor ID into the Zapier authorization field, if you have not connected your Luxafor device yet. Click on the “Yes continue” button when you’re done

- If you have connected the device already, pick that device and click on the “Continue” button

- Pick one of the apps as a trigger to kick off your automation and choose a resulting action from the other app
- Give your Zap a name and turn it on
Enjoy – you have just created your first Zap automation with Luxafor!

Microsoft Teams Mode
We are thrilled to announce the completion of our latest Luxafor software update for Windows! This update brings an integrated functionality with Microsoft Teams in "Teams Only" mode! With the transition from Skype for Business to Microsoft Teams, many users were unable to display their status, as Microsoft did not allow access to the presence information through our previous integration with Skype for Business.
Our new software update for Windows enables Luxafor devices to change colors based on the user's Microsoft Teams presence status. During a call, the Luxafor devices will flash red and purple. If you want to show your Microsoft Teams presence/availability status via Luxafor Flag or Luxafor Bluetooth, you’ll find this information very useful!
If you are looking for ways to connect Luxafor Flag or Luxafor Bluetooth to Microsoft Teams in any other Coexistence modes, please refer to this article.
FOLLOW THESE STEPS TO CONNECT YOUR LUXAFOR DEVICE WITH MICROSOFT TEAMS:
1. Connect Luxafor device.
2. Download and install the latest Luxafor software version for Windows here.
3. Open the "Microsoft Teams" tab in Luxafor software and login with your Teams account.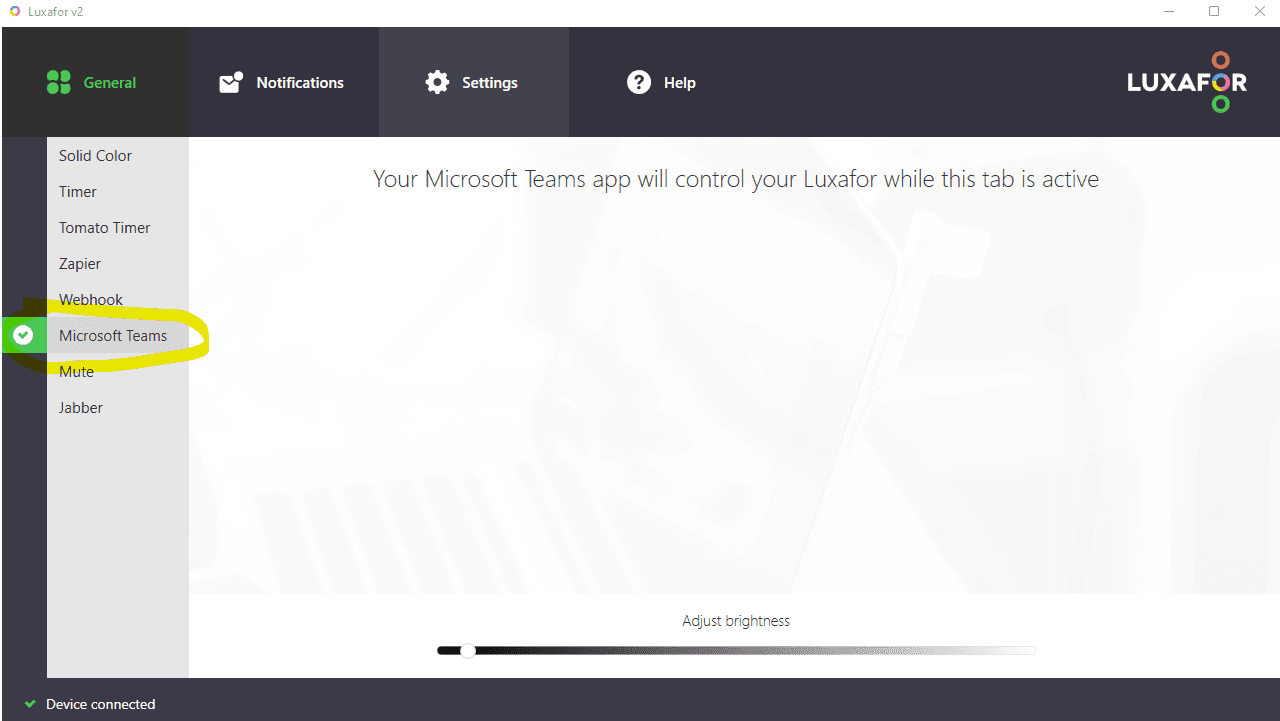
4. Open Microsoft Teams (download it here if not installed on your computer yet).
5. Log into your Microsoft Teams account.
6. Go to "Settings" in Microsoft Teams and ensure "Register Teams as the chat app for Office" is enabled.
7. Enjoy! Your Luxafor device is now connected to your Microsoft Teams account in "Teams Only" mode and includes these
functions:
- Indicates your availability status on Luxafor device according to Teams status;
- Flashes red and purple for the whole duration of a call;
- Changes back to indicate the color of your status immediately after the call has ended.
Troubleshooting:
If the Luxafor device is not flashing red during a call, try "Reset status" function in Microsoft Teams.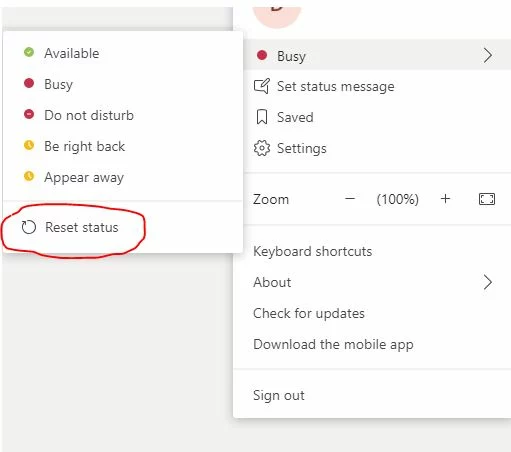
If this doesn’t help, please contact Microsoft Teams support about presence status issues.
Cisco Jabber integration
We are proud to announce that we have finalized our latest Luxafor software update for Windows, which now includes an integration with Cisco Jabber. Cisco Jabber for Windows streamlines communications and enhances productivity by unifying presence, instant messaging, video, voice, voice messaging, screen sharing, and conferencing capabilities securely into one client on your desktop. With our latest software update for Windows, Luxafor devices can change light according to Jabber's presence status and blinks red during a call.
FOLLOW THESE STEPS TO CONNECT YOUR LUXAFOR DEVICE WITH CISCO JABBER:
- After installing Luxafor, restart Jabber client if it was open during the installation.
- Open the “Jabber” tab in Luxafor software.
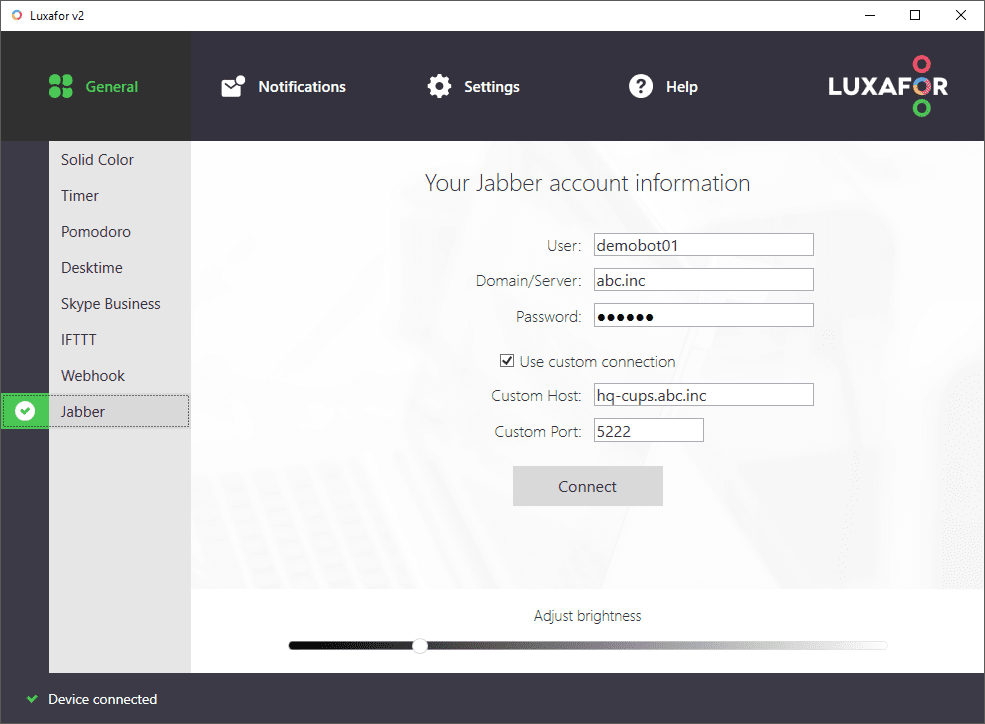
- If you want to represent your Jabber presence status via Luxafor light, fill in your Jabber account details and click Connect. If you don’t know your connection information such as Host and Port, use 5222 for Port and find Host information via the Cisco Jabber application Options -> Accounts -> Instant messaging -> Server Settings.
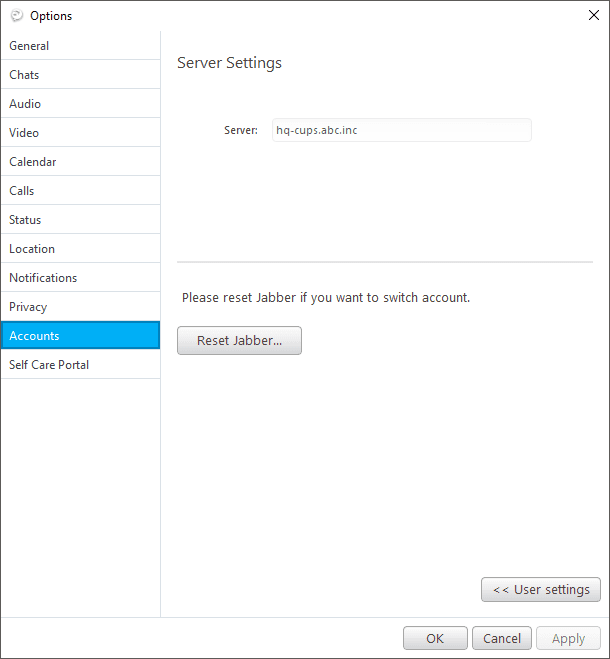
- Optionally you can now change your Jabber presence from Luxafor app.
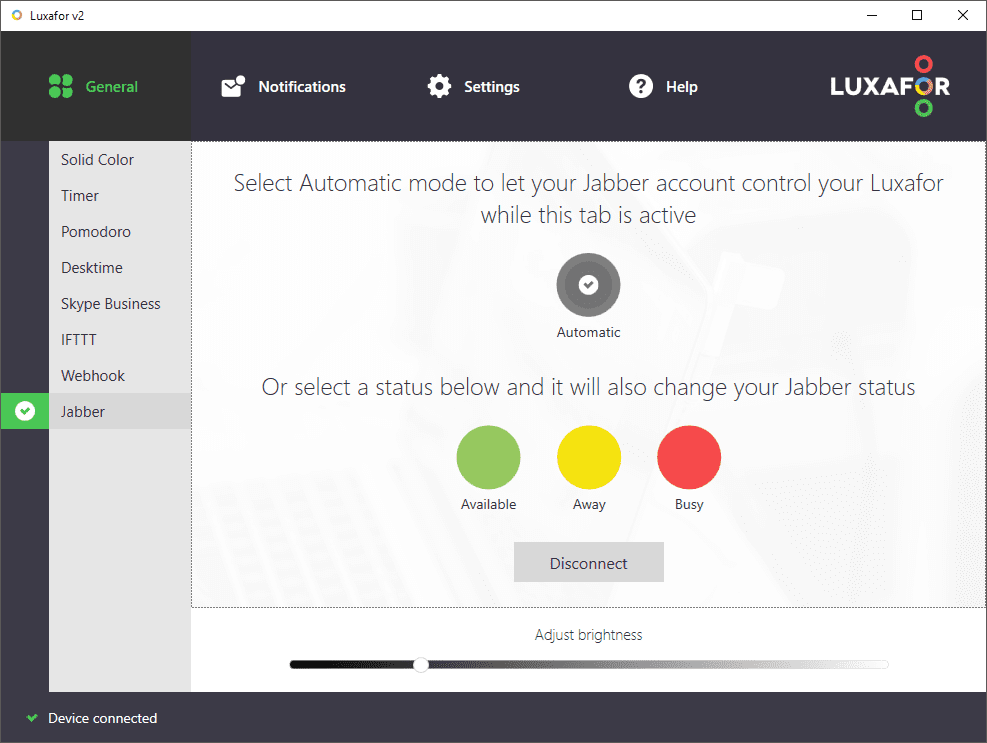
- Enjoy!
Please keep in mind that your call status is monitored all the time while the Jabber tab is selected, even if you’re not connected to your Jabber account.
Skype for Business in Luxafor app
Can I use Luxafor products with Skype for Business?
Yes, you can integrate Luxafor products with Skype for Business. However, the most recent versions of the Luxafor app are optimized for MS Teams integration. To use Luxafor with Skype for Business, you'll need to download an older software version.
Which version of the Luxafor app should I use for Skype for Business?
For Skype for Business integration, you should use the archived Luxafor software version 2.1.0.13.
Where can I download the archived version?
You can download the archived version of the Luxafor app (version 2.1.0.13) from the following link: Download Luxafor for Skype for Business.
What are the steps to install the archived version?
- Uninstall the existing Luxafor 2.0 software from your computer.
- Download the archived version 2.1.0.13 from the provided link.
- Install the downloaded software on your computer.
- After installation, restart your computer to ensure the changes take effect and the Luxafor product functions correctly with Skype for Business.
Should you have any further questions or require assistance, feel free to contact our support team.
Here are a few steps you can take to resolve this issue:
Update your Luxafor Software: You can find this information in the app's Help - About section. Download the latest software on our website, Microsoft store, and Apple store (the latest is 2.1.14.35 + for Win, 2.3.0.+ for Mac)
Reauthorize Luxafor in Teams: Have the end-user log out of the Microsoft Teams section in the Luxafor app, then log back in to prompt a new authorization request. This can often resolve permission-related issues.
Check Teams Privacy Settings: Ensure that the privacy settings in Microsoft Teams are configured to allow external apps like Luxafor to access status information.
Review App Permissions: In the Teams admin center (if using such), check that the Luxafor app is approved and has the necessary permissions to interact with Teams.
If the issue persists after trying these steps, please contact our support providing additional information such as:
- The operation system you are using;
- Any specific error messages that appear when attempting to sync the Teams status with the Luxafor device;
- Whether this issue occurs for multiple users or if it's isolated to a single user;
- What antivirus are you using on your computer;
- Screenshots or videos that you believe might be helpful.
FYI: There's a minor issue with the Microsoft Store where it doesn't display the "update" option, even when a newer version is available. If you're using Windows, kindly uninstall the app, then proceed to download and reinstall it.
Creating a Luxafor Account
If you need a Luxafor account for a service or integration you want to use (like IFTTT), follow these steps:
Start the login process in the service or app.

Look for "Sign up" at the bottom of the login screen and click it.

Enter your email and create a password.
Double-check your email and remember your password.

Click "Continue" to finish.
Once you're done, the service or integration will automatically sign you in (You may need to agree for the service to access certain permissions if it's not directly from Luxafor).
When you join us, you'll get a welcome email to get started. Sometimes, we'll send you emails about keeping your account safe. For example, if we notice anything strange with your account, like someone trying to get in from an unknown location, or if you decide to change your password, we'll let you know through email.
Sometimes our emails might end up in your spam folder. So if you're expecting an email from us and haven't received it, please check your spam folder, it might be hiding in there!
Forgot your password?
If you already have a Luxafor account and just forgot your password, click on "Forgot your password", insert your used email and then confirm the action from your email inbox!

I have other questions
For support or assistance with Luxafor products or services, you can contact our team by emailing support@luxafor.com. When reaching out, it's helpful to provide a detailed description of your issue.
This article explains how to install Luxafor App using command line switches. These switches are similar to the ones used for standard MSI installers.
Supported Switches:
Luxafor App installers (both MSI and EXE) support at least the /quiet (or /q) switch for silent installation. This means the installation process will run in the background without any user prompts.
MSI vs. EXE Installers:
- MSI Installer:
- Uses the
msiexec.execommand with additional switches like /i (install). - Example:
- Uses the
- MSI Installer:
msiexec.exe /i /q LuxaforApp-Installer-2.1.16.37.msi
- EXE Installer:
- Uses the installer's executable name directly with switches like /i (install).
- Example:
- EXE Installer:
LuxaforApp-Installer-2.1.16.37.exe /i /q
Important Notes:
- Not all MSI switches may work identically with the EXE installer.
- The EXE installer typically acts as a wrapper around the MSI file.
- For detailed information on MSI related command line options, refer to the Microsoft documentation: https://learn.microsoft.com/en-us/windows-server/administration/windows-commands/msiexec
This article provides an overview of various USB CDC (Communications Device Class) commands for the Busy Tag device. It details "Get Commands" for retrieving device information, "Set/Get Commands" for configuring device settings, and "Action Commands" for performing operations such as file management and device resets.
1. Overview
Table 1: Command descriptions

Note 1: Added in Firmwarev0.8
Note 2: Added in Firmwarev1.1
2. Get Commands
Returns string data. Each response ends with “\r\n”.
| AT+GDN |
Description:
This command gets device name.
Default:
Determined by hardware.
Command example:
AT+GDN
Response example:
+DN:busytag-653574\r\n
| AT+GMN |
Description:
This command gets the device manufacture name.
Default:
+MN:GREYNUT LTD
Command example:
AT+GMN
Response example:
+MN:GREYNUT LTD\r\n
| AT+GID |
Description:
This command gets device ID. Returns data in hex string format.
Default:
Determined by hardware.
Command example:
AT+GID
Response example:
+ID:F412FA653574\r\n
| AT+GFV |
Description:
This command gets device firmware version.
Default:
Determined by firmware.
Command example:
AT+GFV
Response example:
+FV:0.5\r\n
| AT+GPL |
Description:
This command gets a list of pictures that is stored in device FAT storage. Return structure: +PL:<name>,<size>
Default:
Determined by firmware.
Command example:
AT+GPL
Response example:
+PL:BTS0005.png,5157\r\n
+PL:BTS0004.png,5182\r\n
+PL:BTS0007.png,4355\r\n
OK\r\n
| AT+GFL |
Description:
This command gets a list of files that is stored in device FAT storage. Return structure: +FL:<name>,<type>,<size>
Default:
Determined by firmware.
Command example:
AT+GFL
Response example:
+FL:System Volume Information,dir,0\r\n
+FL:readme.txt,file,120\r\n
+FL:wifi_config.json,file,40\r\n
+FL:config.json,file,1362\r\n
+FL:BTS0005.png,file,5157\r\n
+FL:BTS0004.png,file,5182\r\n
+FL:BTS0007.png,file,4355\r\n
OK\r\n
| AT+GLHA |
Description:
This command gets the device’s local host address. Return structure: +LHA:<local_address>
Default:
Determined by firmware.
Command example:
AT+GFL
Response example:
+LHA:http://busytag-653574.local\r\n
| AT+GFSS |
Description:
This command gets the device's free storage size inbytes. Return structure: +FSS:<size>
Default:
Determined by firmware.
Command example:
AT+GFSS
Response example:
+FSS:3039232\r\n
| AT+GTSS |
Description:
This command gets the device's free storage size in bytes. Return structure: +TSS:<size>
Default:
Determined by firmware.
Command example:
AT+GTSS
Response example:
+TSS:3080192\r\n
| AT+GLEC(1) |
Description:
This command gets the last CDC commands error code. Error code descriptions are in Table 3. Return structure: +LEC:<code>
Default:
+LEC:-1\r\n
Command example:
AT+GLEC
Response example:
+LEC:-1\r\n
Note 1: Added in Firmwarev0.8
| AT+GLRR0(1) |
Description:
This command gets the last reset reason for core 0.Reset reason descriptions are in Table 4. Return structure: +LRR0:<code>
Default:
+LRR0:1\r\n
Command example:
AT+GLRR0
Response example:
+LRR0:1\r\n
| AT+GLRR1(1) |
Description:
This command gets the last reset reason for core 1.Reset reason descriptions are in Table 4. Return structure: +LRR1:<code>
Default:
+LRR1:1\r\n
Command example:
AT+GLRR1
Response example:
+LRR1:1\r\n
Note 1: Added in Firmwarev1.1
3. Set/Get Commands
This group of commands is used to configure specific functions of the Busy Tag device. The Set commands start with the letters “AT+” and are followed by additional letters as the command identifier. The Set command parameters are mandatory and are separated from the command by a comma.
Set command format
| “AT+” | Command Identifier | “=” | Input Parameter | “,” | Input Parameter |
The Get commands start with the letters “AT+” and are followed by additional letters as the command identifier and will end with the “?” character.
Get command format
| “AT+” | Command Identifier | “?” |
| AT+SC |
Description:
This command sets/gets a solid color. The set command has two parameters. The first parameter represents the LED element ID. It uses binary logic addresses for LED identification. For example, 127(0b01111111)will address all device LEDs. The device has a total of 7 LED elements. For example, to set solid color only for the first two LEDs, need to set the parameter to 3(0b00000011). The second parameter is RGB color in hexadecimalformat. Set LED command structure: AT+SC=<led_pins>,<color>. Get return structure: +SC:<led_pins>,<color>.
Default:
Determined by firmware.
Get command example:
AT+SC?
Get response example:
+SC:127,990000\r\n
OK\r\n
Set command example:
AT+SC=127,FF0000
Set response example:
OK\r\n
| AT+CP |
Description:
This command sets/gets custom color pattern array. To set pattern it has specific command routine.
On the first command need to send basic information of file: AT+CP=<pattern_line_count>.
After successful command sending should return “>\r\n” response, after that can be send pattern lines:+CP:<led_pins>,<color>,<speed>,<delay>\r\n. If pattern line sending is successful receive response with “OK” command. Max pattern line size is 40.
Default:
Determined by firmware.
Get command example:
AT+CP?
Get response example:
+CP:127,1291AF,100,0\r\n
+CP:127,FF0000,100,0\r\n
OK\r\n
First set command part example:
AT+CP=3
Set response example on first part:
>\r\n
Second set command part example (pattern lines):
+CP:127,1291AF,100,0\r\n
+CP:127,FF0000,100,0\r\n
+CP:127,1291AF,100,0\r\n
Set response example on second part:
\r\nOK\r\n
| AT+DB |
Description:
This command sets/gets display brightness. <brightness> value range 1-100. Get return structure: +DB:<brightness>
Default:
Determined by firmware.
Get command example:
AT+DB?
Get response example:
+DB:100\r\n
Set command example:
AT+DB=100
Set response example:
OK\r\n
| AT+SAD |
Description:
This command sets/gets show after drop flag.<flag> value range 0-1. Get return structure: +SAD:<flag>.
Default:
Determined by firmware.
Get command example:
AT+SAD?
Get response example:
+SAD:1\r\n
Set command example:
AT+SAD=1
Set response example:
OK\r\n
| AT+AWFS |
Description:
This command sets/gets allow web file server flag.<flag> value range 0-1. Get return structure: +AWFS:<flag>.
Default:
Determined by firmware.
Get command example:
AT+AWFS?
Get response example:
+AWFS:1\r\n
Set command example:
AT+AWFS=1
Set response example:
OK\r\n
Note: If the flag is set, it will automatically disable USB communication and activate the local webserver.
| AT+WC |
Description:
This command sets/gets Wi-Fi config. Set command structure: AT+WC=<ssid>,<password>. For each parameter max 32characters. Get return structure: +WC:<ssid>,<password>.
Default:
Determined by firmware.
Get command example:
AT+WC?
Get response example:
+WC:ssid,password\r\n
Set command example:
AT+WC=ssid,password
Set response example:
OK\r\n
| AT+UMSA |
Description:
This command sets/gets USB mass storage flag.<flag> value range 0-1. Get return structure: +UMSA:<flag>.
Default:
Determined by firmware.
Get command example:
AT+UMSA?
Get response example:
+UMSA:1\r\n
Set command example:
AT+UMSA=1
Set response example:
OK\r\n
| AT+SP |
Description:
This command sets/gets showing picture. Get return structure: AT+SP=<file_name>.
Default:
+SP:def.png\r\n
Get command example(1):
AT+SP?
Get response example:
+SP:BTS0006.png\r\n
Set command example:
AT+SP=BTS0006.png
Set response example:
OK\r\n
Note 1: Added in Firmwarev0.8
| AT+AASS(1) |
Description:
This command sets/gets allowed auto storage scan flag.<flag> value range 0-1. Get return structure: +AASS:<flag>.
Default:
+AASS:1\r\n
Get command example:
AT+AASS?
Get response example:
+AASS:1\r\n
Set command example:
AT+AASS=1
Set response example:
OK\r\n
Note 1: Added in Firmwarev0.8
4. Actions
| AT+GF |
Description:
This command activates the process to get file from device mass storage.
Command example:
AT+GF=wifi_config.json
Response example:
+GF:wifi_config.json,33\r\n
\r\n
{"ssid":"ssid","pass":"password"}\r\n
OK\r\n
| AT+UF |
Description:
This command activates a process to upload files into device mass storage. It has a specific command routine. On the first command need to send basic information of file: AT+UF=<file_name>,<file_size>.
After successful command sending should return “>\r\n” response, after that can be send file content. If file sending is successful receive response with “OK” command. Max file size for upload is 1MB.
First command part example:
AT+UF=wifi_config.json,33
Response example on first part:
>\r\n
Second command part example (content of file):
{"ssid":"ssid","pass":"password"}
Response example on second part:
\r\nOK\r\n
| AT+DF |
Description:
This command activates the process to get file from device mass storage.
Command example:
AT+DF=BTS0002.png
Response example:
+DF:BTS0002.png,2922\r\n
OK\r\n
| AT+RST |
Description:
This command restarts the device.
Command example:
AT+RST
Response example:
OK\r\n
| AT+FD |
Description:
This command activates the process to format device mass storage. After formatting the storage device will restart.
Command example:
AT+FD
Response example:
OK\r\n
| AT+AFSS |
Description:
This command activates file storage scan. On file storage scan initialize def files, checks if has new firmware bin file.
Command example:
AT+AFSS
Response example:
OK\r\n
| AT+FRMCF(1) |
Description:
This command activates factory reset for main config file.
Command example:
AT+FRMCF
Response example:
OK\r\n
| AT+FRWCF(1) |
Description:
This command activates factory reset for Wi-Fi config file.
Command example:
AT+FRWCF
Response example:
OK\r\n
Note 1: Added in Firmware v1.1
| AT+FRDI(1) |
Description:
This command activates factory reset for default image.
Command example:
AT+FRDI
Response example:
OK\r\n
Note 1: Added in Firmware v1.1
5. Event Commands
Table 2: Event overview
| Event Name | Description |
| +evn:SP | Showing picture event |
| +evn:FU | Firmware updating event |
| +evn:PP | Playing pattern event |
| +evn:WIS | Writing in storage event |
Event format
| “+evn:” | Event Identifier | “,” | Additional Parameter |
| +evn:SP |
Description:
Showing picture event. An additional parameter is image name, which is starting to display.
Event example:
+evn:SP,BTS0002.png
| +evn:FU |
Description:
Firmware updating event. An additional parameter represents the percentage stage of the updating process.
Event example:
+evn:FU,9.12%
| +evn:PP |
Description:
Playing pattern event. An additional parameter represents the state of LEDs: 1- playing pattern; 0- stopped to play pattern and showing solid color.
Event example:
+evn:PP,1
| +evn:WIS |
Description:
Writing in storage event. An additional parameter represents the state of storage: 1- writing in storage; 0- stopped to write in storage.
Event example:
+evn:WIS,1
6. Command Error Codes
Errors are received in format:“ERROR:<error_code>\r\n”.
Table 3: Error code descriptions
| Error code | Description |
| -1 | None |
| 0 | Unknown error |
| 1 | Unknown command |
| 2 | Invalid argument |
| 3 | File not found |
| 4 | Invalid size |
Table 4: Reset reason descriptions
| Error code | Description |
| 1 | Power on reset |
| 3 | Software resets the digital core |
| 5 | Deep sleep reset the digital core |
| 6 | SDIO module resets the digital core |
| 7 | Main watch dog 0 resets digital core |
| 8 | Main watch dog 1 resets digital core |
| 9 | RTC watch dog resets digital core |
| 11 | Main watch dog resets CPU |
| 12 | Software resets CPU |
| 13 | RTC watch dog resets CPU |
| 14 | CPU0 resets CPU1 |
| 15 | Reset when the VDD voltage is not stable |
| 16 | RTC watch dog resets digital core and rtc module |
1.How to activate local web server
1.1 Using USB CDC commands
Any type of software that supports USB serial communication (HTerm, MobaXterm, PuTTy, etc.) can be used. To recognize which is the Busy Tag device in the serial device list, iterate through serial ports and send the AT command: AT+GDN. The Busy Tag device will respond with +DN:busytag-XXXXXX\r\n.

1. Illustration: Getting a Busy Tag name using the AT command
The next action is to transmit the AT command, AT+GLHA, to obtain the local host address. In response, the device will return +LHA:http://busytag-XXXXXX.local. Keep that address somewhere. This address is unique to the device and is not affected by disk formatting, reboots, or other changes.

2. Illustration: Getting a Busy Tag local host address using the AT command
Sending the Wi-Fi access point passwords (router, mobile hotspot, etc.) is required. To enable those settings, send the AT command AT+WC=ssid, password. Send AT+WC? to double-check that the parameters are saved correctly. When the device is configured to host a local web server, those settings will be applied.

3. Illustration: Setting the Busy Tags Wi-Fi configuration
If the above-listed requirements are met, the device can go into local web server mode. Send the AT command AT+AWFS=1 to activate mode. After receiving the OK command, it automatically disconnects USB communication and activates the device's webserver.

4. Illustration: Activate the Busy Tags local web server
More detailed information on USB CDC commands can be found at https://luxafor.helpscoutdocs.com/article/47-busy-tag-usb-cdc-command-reference-guide
Note: In case the local host addresses are not stored or remembered, the device can be reset to its default settings by pressing the reset button located on the back of the device and repeating the previous instructions.
1.2 Using device mass storage files
A device should show up as device mass storage when it is attached to a PC. It contains readme.txt, wifi_config.json, and config.json as default files.

5. Illustration: Default files in Busy Tag mass storage
First, the readme.txtfile should be opened, and the local link should be copied and stored appropriately. It needs to be done before web server mode is active because, in that mode, USB communication is closed.

6. Illustration: Readme file
The subsequent step involves opening the wifi_config.json file with text editor software and entering the desired access point configuration. That new configuration file needs to be saved in the device storage.

7. Illustration: Wi-Fi config file
By following the aforementioned steps, the device's local web server can be activated. Open the config.json file with a text editor and set the "allow_file_server" parameter to true. Save the changes to the device's storage. Upon saving the updated configuration file, USB communication will be automatically terminated.

8. Illustration: Config file
Note: Renaming files will prevent settings from being active, therefore avoid doing so.
To verify if the local web server is active, open terminal software and ping the device's local address, which was copied and stored previously.

9. Illustration: Pinging to the local address
Note: Occasionally, web server mode will not correctly activate after the previous steps have been followed to enable it. A little reboot is therefore necessary for a gadget. Recommending turning the gadget on and off. The new device settings won't be affected by this procedure.
2. Web API
2.1 Get file list
Method: GET
Endpoint: http://busytag-XXXXXX.local/list
Body: <empty>
Response message example:
[
    {
        "name": "readme.txt",
        "type": "file",
        "size": 120
    },
    {
        "name": "wifi_config.json",
        "type": "file",
        "size": 40
    },
    {
        "name": "config.json",
        "type": "file",
        "size": 348
    },
    {
        "name": "def.png",
        "type": "file",
        "size": 16224
    },
    {
        "name": "System Volume Information",
        "type": "directory",
        "size": 0
    }
]

10. Illustration: Getting file list
2.2 Upload file
Method: POST
Endpoint: http://busytag-XXXXXX.local/upload/<path/to/file>
Body: image binary
Response message example: File uploaded successfully

11. Illustration: Uploading image
2.3 Get file
Method: GET
Endpoint: http://busytag-XXXXXX.local/<path/to/file>
Body: <empty>
The response message depends on the file content.

12. Illustration: Getting config file

13. Illustration: Getting image file
2.4 Delete file
Method: POST
Endpoint: http://busytag-XXXXXX.local/delete/<path/to/file>
Body: <empty>
Response message example: File deleted successfully

14. Illustration: Delete file
2.5 Configuration file
2.5.1 How to set the desired image to display

15. Illustration: Choosing the image to be shown
In the config.json file, the parameter "show_after_drop" needs to be set to false. Replace "image" with the name of the desired image that is stored on the device.
2.5.2 How to set the desired display brightness
To adjust the brightness of the device display, set the "disp_brightness" parameter in the config.json file within the range of 0 to 100.

16. Illustration: Configuring display brightness
2.5.3 How to set LED color
There are two parameters to configure: "led_bits" and "color". The "led_bits" parameter specifies which LEDs need to be set and uses binary logic for LED identification. For instance, 127 (0b01111111) will address all LEDs on the device, which has a total of seven LED elements. To seta new solid color for only the first two LEDs, the parameter should be set to 3(0b00000011). An 8-bit value can also be used. If a specific bit is set, for example, 67 (0b10000011), it will set the first two LEDs to the desired color while clearing the remaining LEDs. The second parameter, "color," is RGB color in hexadecimal format. To set the red color to max brightness, set the value to "FF0000," green to "00FF00," and blue to"0000FF".

17. Illustration: Activate solid color for the device
2.5.4 How to activate LED pattern

18. Illustration: Setting police LED pattern
There are three main parameters to configure: "activate_pattern," "pattern_repeat,” and “custom_pattern_arr,” each with sub-elements. If the "activate_pattern" parameter is set to true, it allows the device to play a pattern upon receiving a new configuration file. The "pattern_repeat" parameter can be set from 0 to 255, representing the loop count for the playing pattern. If "pattern_repeat" is set to255, the pattern will loop endlessly. The "custom_pattern_arr" parameter is an array of pattern line elements. Each pattern line contains four parameters:"led_bits," "color," "speed," and" delay." The "led_bits" parameter specifies which LEDs need to be set and uses binary logic for LED identification. The "color" parameter is an RGB color in hexadecimal format. The "speed" parameter sets the speed for changing the LED step level. The "delay" parameter sets the delay, in milliseconds, before activating a new pattern line. The maximum array of the parameter " custom_pattern_arr" can be 40 pattern line elements.
2.5.5 How to deactivate a web server
To deactivate the webserver, you need to set the parameter "allow_file_server" to false. If that parameter is set to false, it will deactivate the web server and activate USB communication.

19. Illustration: Deactivate web server
Setup
Step 1: Install the Luxafor Plugin
- Visit the Elgato Marketplace and search for "Luxafor" or use direct link to Luxafor Plugin
- Click the "Open in Stream Deck" button.
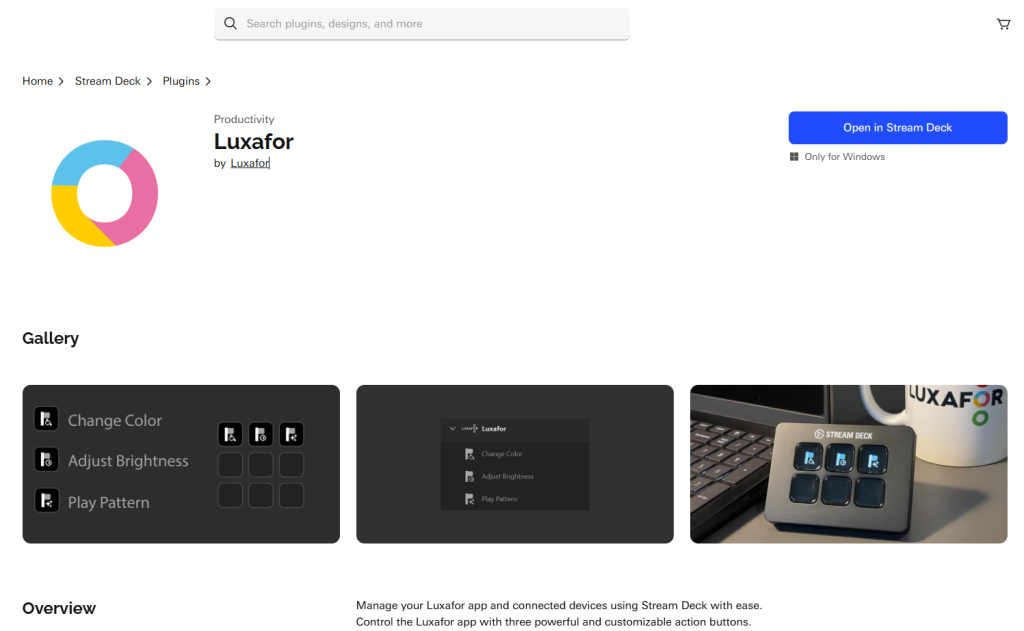
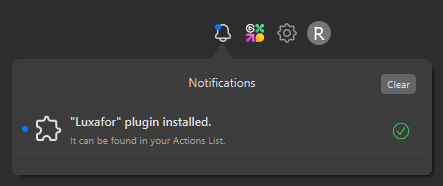
- In stream Deck app you will see a notification: "Luxafor plugin installed."
- Click the "Open in Stream Deck" button.
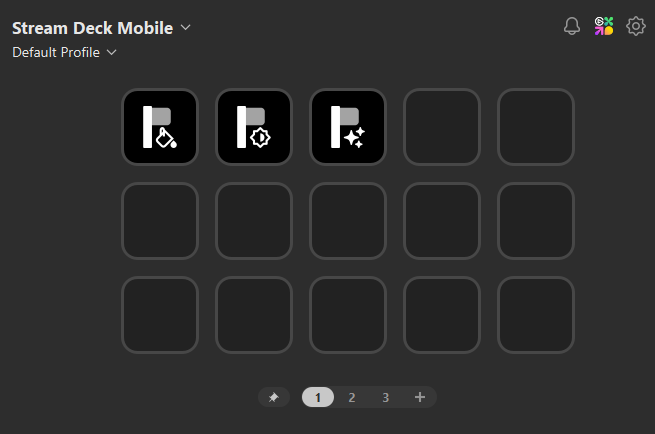
Step 2: Add and Configure Action Buttons
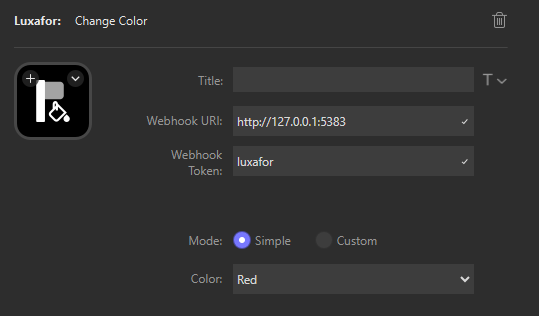
- You can set a custom Title for each button, change icon, adjust its functionality, etc.
Troubleshooting
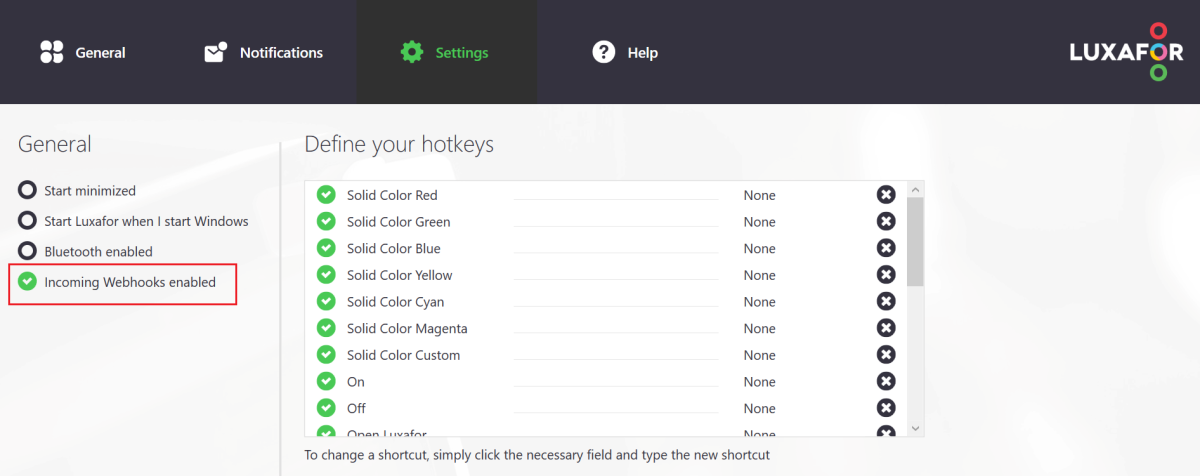
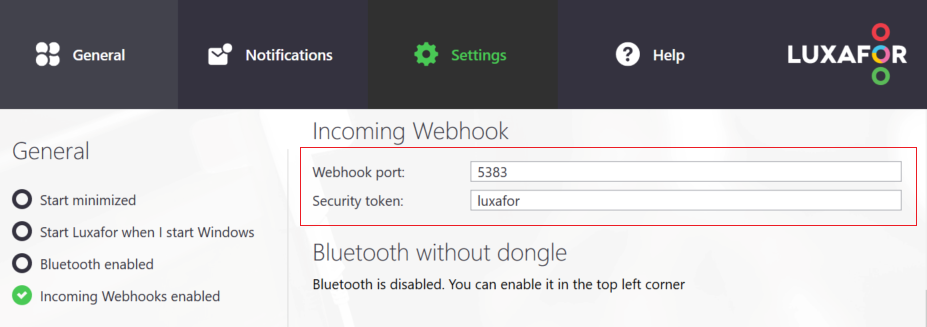
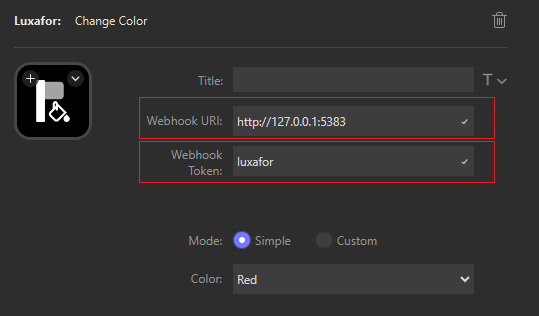
- The Webhook Token should match the Security Token from your Luxafor app. You can find this in the Luxafor app under Settings → Incoming Webhook section.
- The Webhook URI is set to http://127.0.0.1:5383. Make sure the port number ":5383" matches the Webhook Port listed in the Luxafor app's settings. This is the default setting unless you have customized it.
About Luxafor
Our Office
- Legal information:
- Company name: Greynut LTD
VAT number: LV40103684124
Legal address: Ropažu str. 16B - 41, Riga, Latvia, LV-1039 - HQ and warehouse:
- Biķernieku iela 1A
- Riga, Latvia, LV-1039
- Tech support: support@luxafor.com
- For guest blogs and link insertions: SEO@luxafor.com
- +371-277-555-44 (GMT+2)
- +1-917-730-2079 (GMT+2)


