

1. Overview #
Luxafor Signal is an ESP32-based device with 12 RGB LEDs and MP3 audio playback. Besides the USB serial (AT command) interface, the device runs a local HTTP server on your network. This lets any computer, phone, or script on the same network control the device — set LED colors, play sounds, upload files, and run any AT command — without a USB cable and without internet access.
The local network stack consists of:
- WiFi — Station mode (device joins your router) and/or Access Point mode (device creates its own network).
- HTTP server — REST-style API on port 80, started automatically when WiFi comes up.
- mDNS discovery — the device is reachable by name: http://luxafor_signal-xxxxxx.local (where xxxxxx is the last 6 hex digits of the device MAC address).
- Token authentication — all API requests require a Bearer token.
Initial setup (WiFi credentials, reading the auth token) is done once over the USB serial interface (460800 baud, 8N1). After that, everything works over the network
2. Step 1: Connect the Device to Your WiFi #
Open a serial terminal on the device’s USB COM port and run:
AT+STA=YourNetworkName,YourPassword
OK

AT+WM=1
OK

+evn:WIFI_STA_START +evn:WIFI_GOT_IP,192.168.1.100 +evn:WIFI_CONNECTED,YourNetworkName,192.168.1.100
AT+STA= stores the credentials (they persist across reboots) and AT+WM=1 enables Station mode. The device retries a failed connection 6 times, then periodically every 30 seconds.
Useful checks:
AT+STA?      -> +STA:1,YourNetworkName,192.168.1.100,-45
AT+GIP       -> +IP:192.168.1.100
Alternative: Access Point mode #
If there is no router available, let the device create its own network:
AT+WM=2
OK
+evn:WIFI_AP_START
The default AP SSID is luxafor_signal-XXXXXX. Connect your computer or phone to that network; the device is then reachable at its AP address (typically 192.168.4.1). AP settings (SSID, password, channel) can be changed with AT+AP=<ssid>,<password>[,<channel>,<max_conn>,<authmode>]. Mode 3 (AT+WM=3) runs Station and Access Point simultaneously.
3. Step 2: Find the Device on the Network #
The single most useful command is:
AT+GLHA
+LHA:luxafor_signal-abc123.local,192.168.1.100,80
It returns the mDNS hostname, the IP address, and the HTTP port. The device can be reached in two ways:
- By name (mDNS): http://luxafor_signal-abc123.local — works on most home networks (Windows 10+, macOS, Linux with Avahi, iOS, Android).
- By IP address: http://192.168.1.100 — always works; use this if .local name resolution fails on your network.
Opening the address in a web browser shows a built-in status page with device information and API usage examples.
4. Step 3: Get the Authentication Token #
Every API request must carry an Authorization header. The token is generated on the device (a random 32-character string) and is retrieved or managed over USB:
AT+LT?                     # read the current token
+LT:Kf3aB9xQ7mP2nR8sT1uV4wY6zA0cD5eG

AT+LT                      # regenerate (invalidates the old token)
+LT:

AT+LS=1,80,mytoken123      # or set your own token (enable, port, token)
OK

AT+LS?                     # check server status: enabled, port, auth
+LS:1,80,enabled
Requests without a valid token receive 401 Unauthorized.
5. HTTP API Reference #
Base URL: http://<device_ip> or http://luxafor_signal-xxxxxx.local (port 80 by default).
All requests except GET / require the header:
Authorization: Bearer <token>

CORS is enabled on all endpoints (OPTIONS preight is handled), so the API can be called directly from browser-based applications.
5.1 POST /at — execute an AT command #
Request body: {“command”: “<AT command>”}. The response wraps the raw AT reply in JSON:
{
  "status": "success",
  "message": "Command executed",
  "data": "+DN:luxafor_signal-ABC123\r\nOK\r\n"
}
Any command from the AT reference works: LED control (AT+SC=), audio (AT+PLAY=, AT+VOL=), device info, WiFi status, file listing, and so on.
5.2 GET /status — device status #
Returns JSON with server settings and device identity:
{
  "status": "running",
  "port": 80,
  "auth_required": true,
  "max_connections": 4,
  "wifi_mode": 1,
  "device_id": "AABBCCDDEEFF",
  "firmware_version": "1.0",
  "project_name": "luxafor_signal",
  "compile_date": "...",
  "compile_time": "..."
}
5.3 POST /file and GET /file — file transfer #
The file name is passed as the name query parameter; the upload body is the raw file content (no multipart encoding). Maximum file size: 1 MB.
# upload an MP3
curl -X POST "http://192.168.1.100/file?name=alert.mp3" \
 -H "Authorization: Bearer " \
 --data-binary @alert.mp3

# download it back
curl "http://192.168.1.100/file?name=alert.mp3" \
 -H "Authorization: Bearer <token>" -o alert.mp3
Files can afterwards be listed (AT+GML) and played (AT+PLAY=) via POST /at. To delete file, send AT+DF=<filename> through /at.
5.4 POST /pattern — upload an LED pattern #
The body is plain text, one pattern step per line, in the same format that AT+CP? prints and AT+CPD= accepts:
+CP:<led_bits>,<RRGGBB>,<speed>,<delay>
led_bits is a bitmask selecting LEDs (4095 = all 12), RRGGBB a hex color, speed the fade speed and delay the hold time in milliseconds. Example — alternate all LEDs red/green:
curl -X POST http://192.168.1.100/pattern \
  -H "Authorization: Bearer <token>" \
  --data-binary $'+CP:4095,FF0000,100,500\n+CP:4095,00FF00,100,500'
Start playback (3 repetitions; 255 = infinite) through /at:
curl -X POST http://192.168.1.100/at \
  -H "Authorization: Bearer <token>" \
  -H "Content-Type: application/json" \
  -d '{"command": "AT+PP=1,3"}'
6. AT Commands Available over the Local Network #
Every AT command is dispatched through the same firmware handler regardless of interface, so the full command set below can be executed remotely by sending POST /at with body {“command”: “…”}.
Commands are case-insensitive. Responses arrive in the data field of the JSON reply exactly as they would appear on the serial console (including the trailing OK or ERROR:<codes>; codes are listed in section 8).
6.1 General #

6.2 Device Information #

6.3 Files and Storage #

For uploading and downloading files through the network connection itself, use the POST /file and GET /file endpoints (section 5.3).
6.4 LED Control #

Built-in Patterns #
AT+DP=<id> copies one of the following patterns into the custom pattern slot; start it afterwards with AT+PP=1,<repeat>.

6.5 Audio #

6.6 WiFi #

6.7 Local Server and Cloud #

7. Usage Examples #
7.1 cURL #
TOKEN="<your token from AT+LT?>"
HOST="http://luxafor_signal-abc123.local"

# set all 12 LEDs red
curl -X POST $HOST/at \
 -H "Authorization: Bearer $TOKEN" \
 -H "Content-Type: application/json" \
 -d '{"command": "AT+SC=4095,FF0000"}'

# play a sound at 75% volume
curl -X POST $HOST/at -H "Authorization: Bearer $TOKEN" \
 -H "Content-Type: application/json" -d '{"command": "AT+VOL=75"}'
curl -X POST $HOST/at -H "Authorization: Bearer $TOKEN" \
 -H "Content-Type: application/json" \
 -d '{"command": "AT+PLAY=coin_sound.mp3,2"}'

# read chip temperature
curl -X POST $HOST/at -H "Authorization: Bearer $TOKEN" \
 -H "Content-Type: application/json" -d '{"command": "AT+GTEMP"}'

# device status
curl $HOST/status -H "Authorization: Bearer $TOKEN"
7.2 Python #
import requests

HOST = "http://192.168.1.100"   # or http://luxafor_signal-abc123.local
TOKEN = "<your token>"
HEADERS = {"Authorization": f"Bearer {TOKEN}"}

def at(command):
    r = requests.post(f"{HOST}/at", headers=HEADERS,
                      json={"command": command}, timeout=5)
    r.raise_for_status()
    return r.json()["data"]

print(at("AT+GDN"))              # device name
at("AT+SC=4095,00FF00")          # all LEDs green
at("AT+PLAY=notification.mp3")   # play a sound

# upload a file
with open("alert.mp3", "rb") as f:
     requests.post(f"{HOST}/file", params={"name": "alert.mp3"},
                   headers=HEADERS, data=f.read(), timeout=60)

print(requests.get(f"{HOST}/status", headers=HEADERS).json())
7.3 PowerShell #
$token = "<your token>"
$hostAddr = "http://192.168.1.100"
$headers = @{ Authorization = "Bearer $token" }

# all LEDs blue
Invoke-RestMethod -Method Post -Uri "$hostAddr/at" -Headers $headers `
  -ContentType "application/json" `
  -Body '{"command": "AT+SC=4095,0000FF"}'

# device status
Invoke-RestMethod -Uri "$hostAddr/status" -Headers $headers
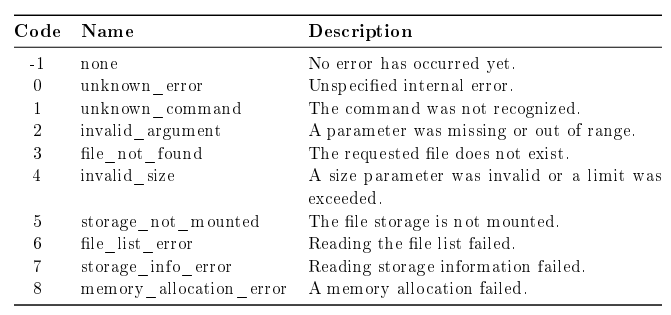
8. AT Command Error Codes #
A failed AT command returns ERROR:<code> in the data field of the POST /at reply. The HTTP status is still 200 in that case — the request itself succeeded, only the command failed — so always inspect the data field. The last error code can also be read back with AT+GLEC.
9. Troubleshooting #

10. Security Notes #
- Traffic is plain HTTP — unencrypted. Use the device only on trusted local networks; the server is not exposed to the internet.
- The auth token is visible on the root info page (GET /, which requires no authentication) — anyone on the network who can open the page can read it. Treat network access as device access.
- Regenerate the token with AT+LT or set your own with AT+LS=1,80,<token> whenever needed; the old token stops working immediately